URP 12(测试环境12.1.10,下文简称12)默认半透明物体不渲染阴影,目标是希望实现一套高质量的半透阴影,并且阴影也能够随材质主贴图Alpha变化而变化。
折腾了半透明阴影渲染方案一阵子,记录下阶段性的总结,整理一下心得和收获。
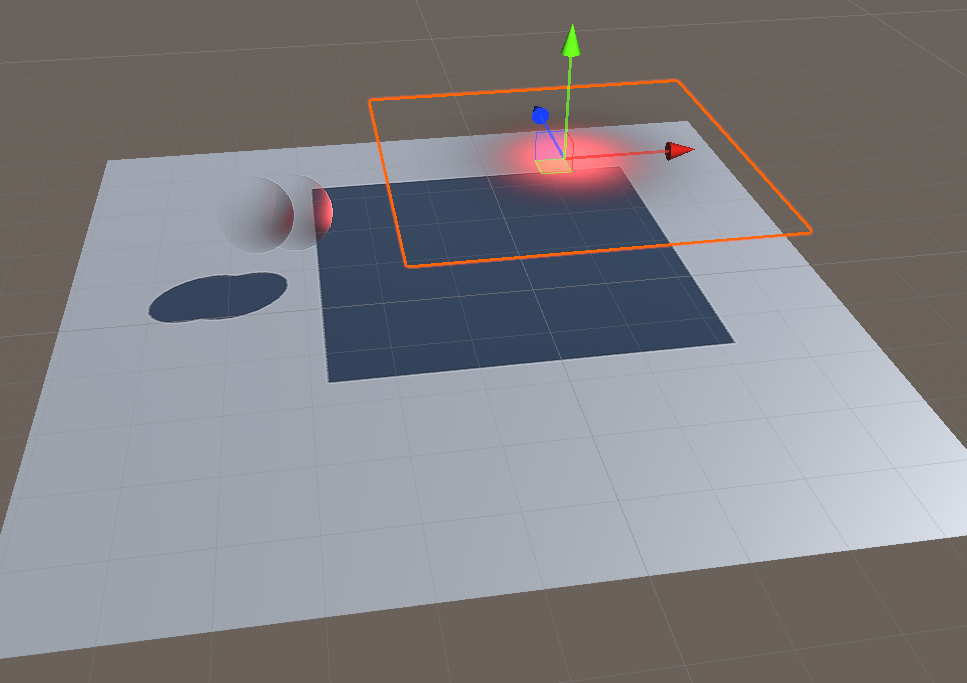
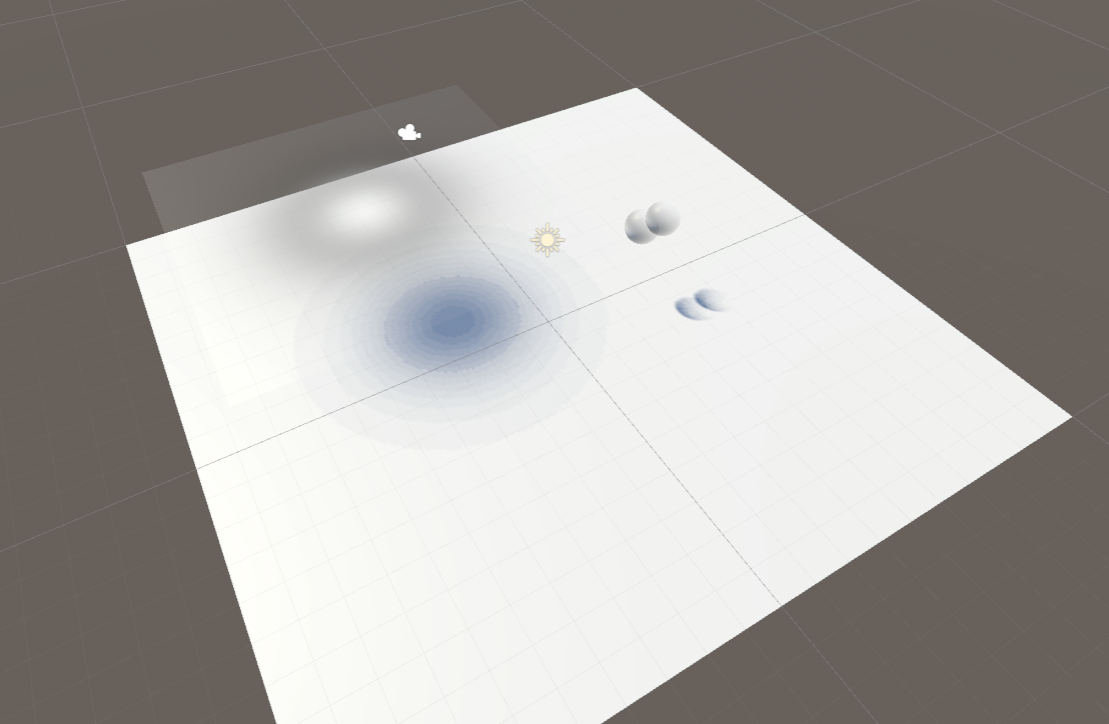
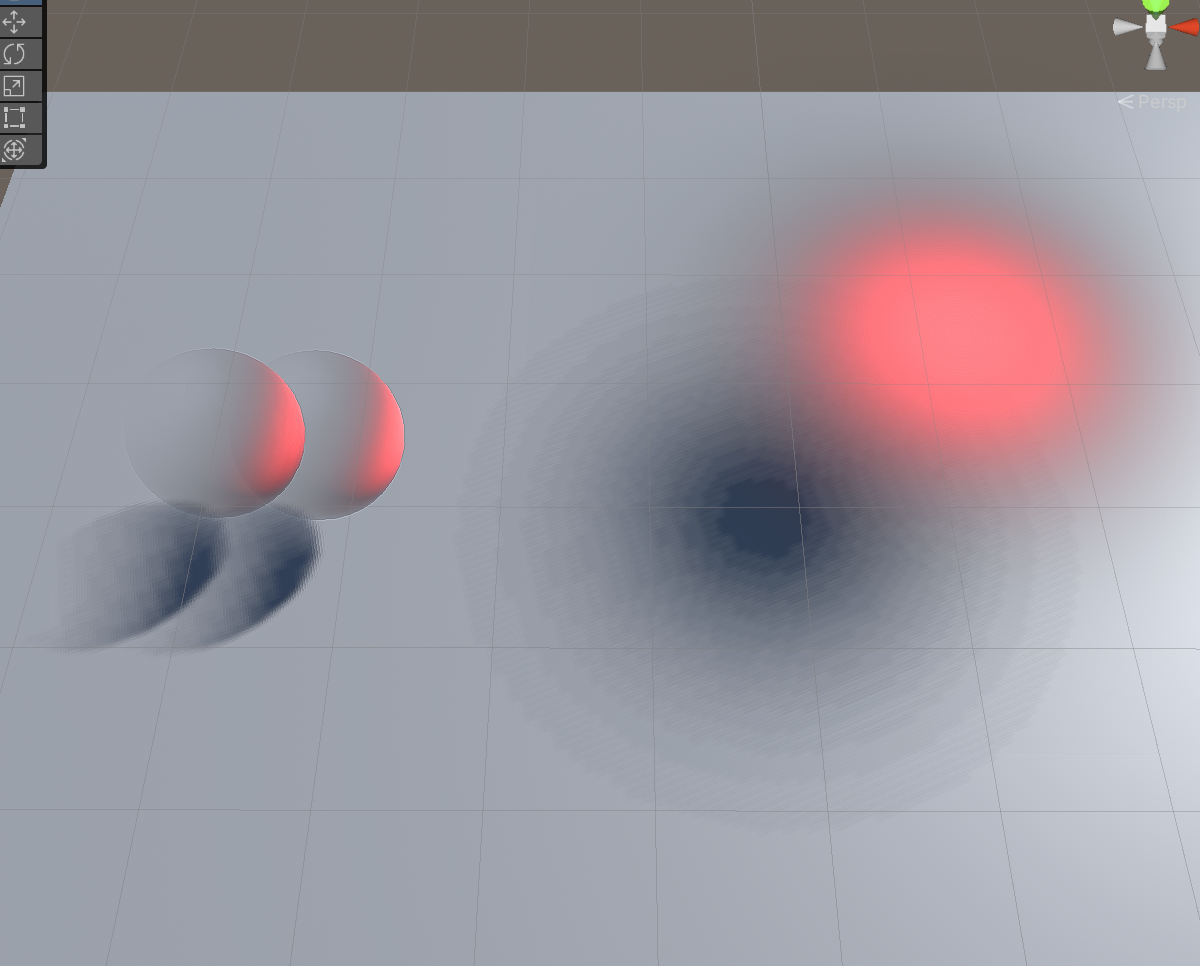
先上最终效果:

问题的产生
在选择合适的半透明阴影渲染方案之前,首先要了解问题是如何产生的。
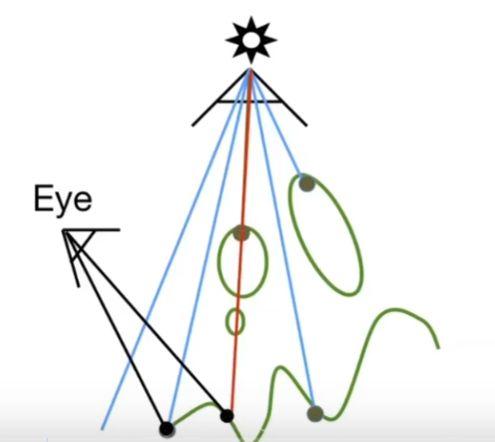
在传统的Render Pipline中,我们会使用depth buffer记录不透明的物体的深度值,用来表示物体到相机的距离,并以此为基础进行深度排序处理同一像素内物体的遮挡关系,所以我们只需记录最接近视点的fragment深度即可。然而,对于半透明物体,事情会变得更加复杂。半透明物体通常会透明地叠加在其他物体之上,近于最近视点的不透明物体的每个的半透明物体都会影响最终像素的渲染结果,这意味着在depth buffer中无法简单地通过深度值来确定半透明物体的遮挡关系。引擎中的处理思路一般是对半透明物体按相对摄像机的距离远近排序,按从后往前的顺序渲染(Z Test On(LEqual),Z Write Off),更新color buffer中的值。
然而这种排序并不能解决半透明物体产生阴影的问题,这是由于ShadowMap的原理造成的:1.从光源的角度生成一遍深度值(Shadow Map) 2.从摄像机的角度,根据当前depth buffer和第一步产生的ShadowMap比较,如果光源产生的深度小于当前像素的深度值,则认为在阴影中。这种方法对于半透明物体就存在问题,因为半透明物体并不写入depth buffer。
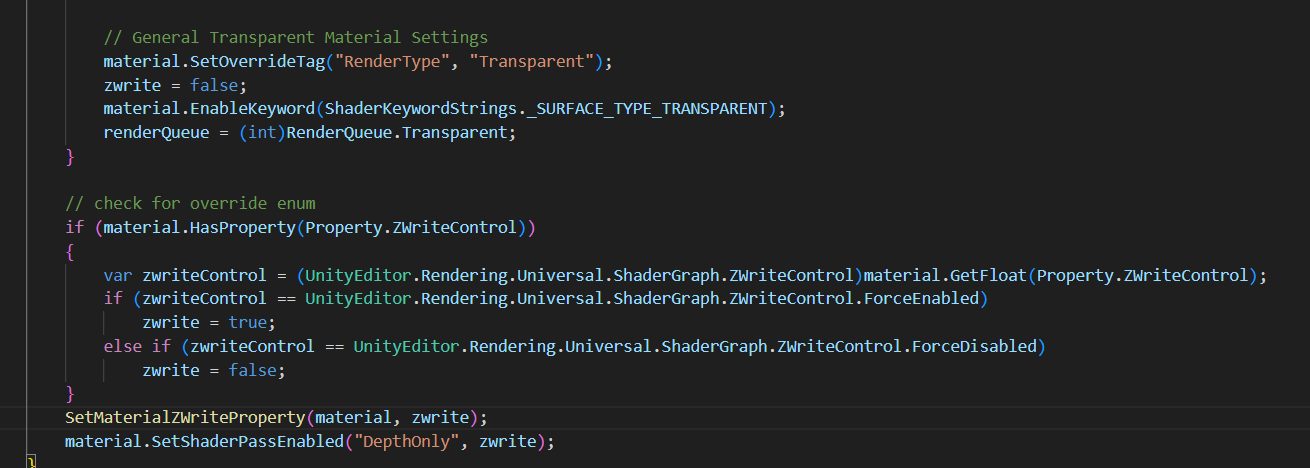
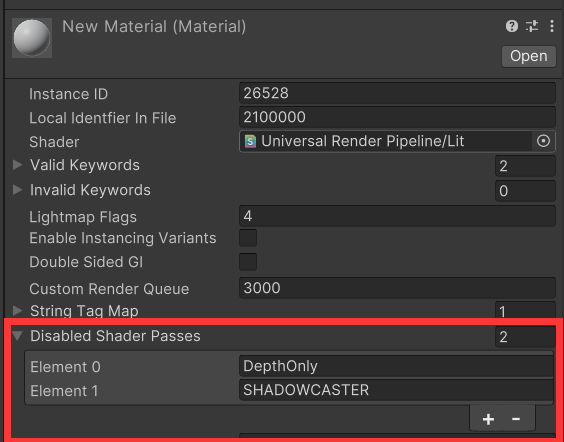
针对上述情况,URP(12)中,为了避免复杂的性能开销,管线中默认(即使用默认的Lit材质)直接禁止了半透明物体参与ShadowMap、DepthOnly相关Pass,只能接收来自不透明物体的阴影,无法产生自投影:
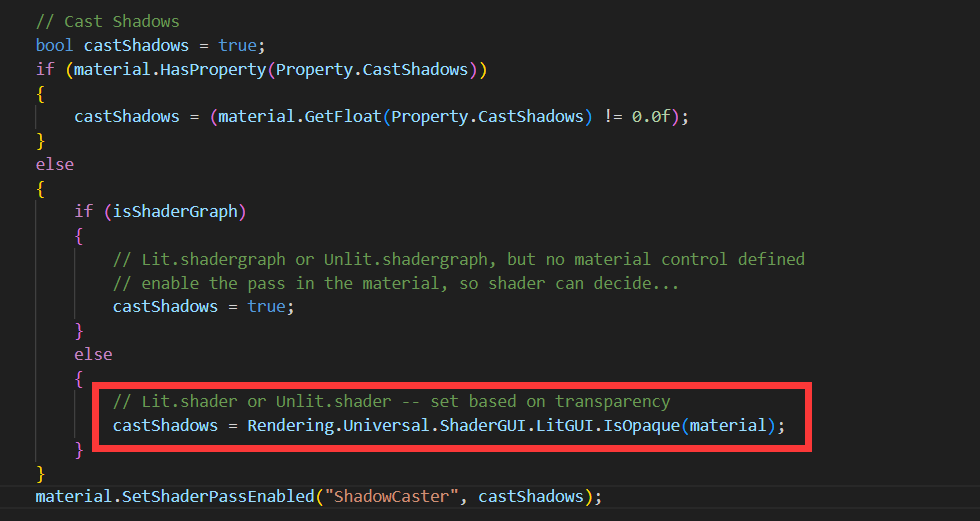
上图来自URP文件BaseShaderGUI.cs。打开材质Debug面板也可以看到相关Pass被禁用。
投递阴影与接收阴影
虽然半透明物体无法写入深度,但是依然可以参与到shadowmap的计算,以此产生投影和接收阴影。
URP管线中禁止半透物体参与shadowcast Pass,我们可以写自定义Shader 让半透物体添加shadowcast Pass,参照URP/Lit写法即可。
        Pass
        {
            Name "ShadowCaster"
            Tags{"LightMode" = "ShadowCaster"}

            ZWrite On
            ZTest LEqual
            ColorMask 0
            Cull[_Cull]

            HLSLPROGRAM
            #pragma exclude_renderers gles gles3 glcore
            #pragma target 4.5

            // -------------------------------------
            // Material Keywords
            #pragma shader_feature_local_fragment _ALPHATEST_ON
            #pragma shader_feature_local_fragment _SMOOTHNESS_TEXTURE_ALBEDO_CHANNEL_A

            //--------------------------------------
            // GPU Instancing
            #pragma multi_compile_instancing
            #pragma multi_compile _ DOTS_INSTANCING_ON

            // -------------------------------------
            // Universal Pipeline keywords

            // This is used during shadow map generation to differentiate between directional and punctual light shadows, as they use different formulas to apply Normal Bias
            #pragma multi_compile_vertex _ _CASTING_PUNCTUAL_LIGHT_SHADOW

            #pragma vertex ShadowPassVertex
            #pragma fragment ShadowPassFragment

            #include "Packages/com.unity.render-pipelines.universal/Shaders/LitInput.hlsl"
            #include "Packages/com.unity.render-pipelines.universal/Shaders/ShadowCasterPass.hlsl"
            ENDHLSL
        }
可以看到半透物体目前能够产生阴影了,也能接收其他半透物体的阴影投射。
目前来说仅仅是制作了阴影,是远远不够的,我们还需要制作真正的半透阴影。
阴影半透方案
在敲定方案细节前,我前后参考了很多实现方式,抛开UE里的体素渲染(傅里叶不透明度贴图)这种很难在移动端应用的方案,大部分管线中用的都是dither的方法来模拟半透阴影,一来是因为dither是根据alpha裁剪来模拟透明变化,可以很好的处理半透阴影混合,二来相对于修改shadowmap这种方式节省不少成本。
Build-in
Build-in管线下默认的Standard材质是支持半透阴影的,它使用的是Unity自带的3D Dither贴图。
放大可以看到dither噪点:

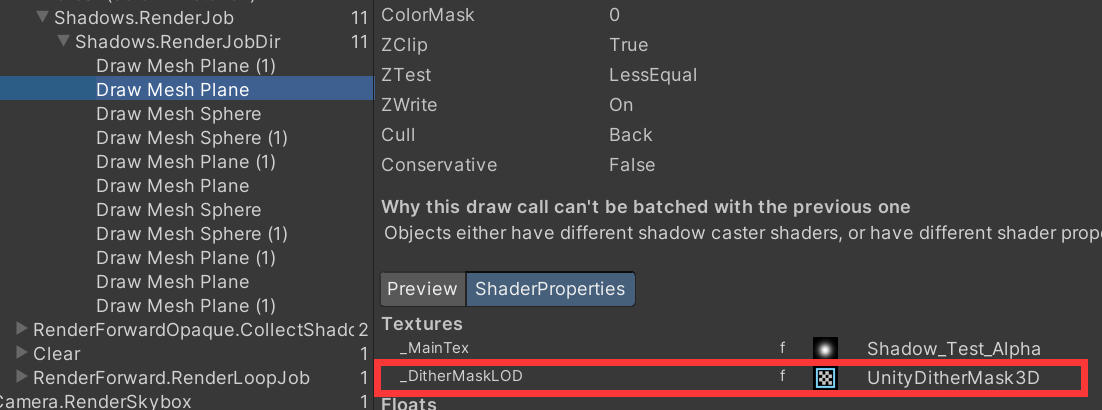
Build-in源码UnityStandardShadow.cginc实现:

理解起来很简单,因为_DitherMask是一个4x4x16的3D贴图,Z轴上贴图通道序号为0-15,所以对应的alpha * 15/16(0.9375),xy对应的是屏幕坐标*系数。
把这套方案迁移到URP下,修改上文自定义Shadowcast Pass:
 #if defined( CAN_SKIP_VPOS )
	float2 vpos = input.positionCS.xy;
#endif
       alphaRef = SAMPLE_TEXTURE3D( _DitherMaskLOD,sampler_DitherMaskLOD, float3( vpos.xy * 0.25, BaseAlpha * 0.9375 ) ).a;
       clip( alphaRef - 0.01 );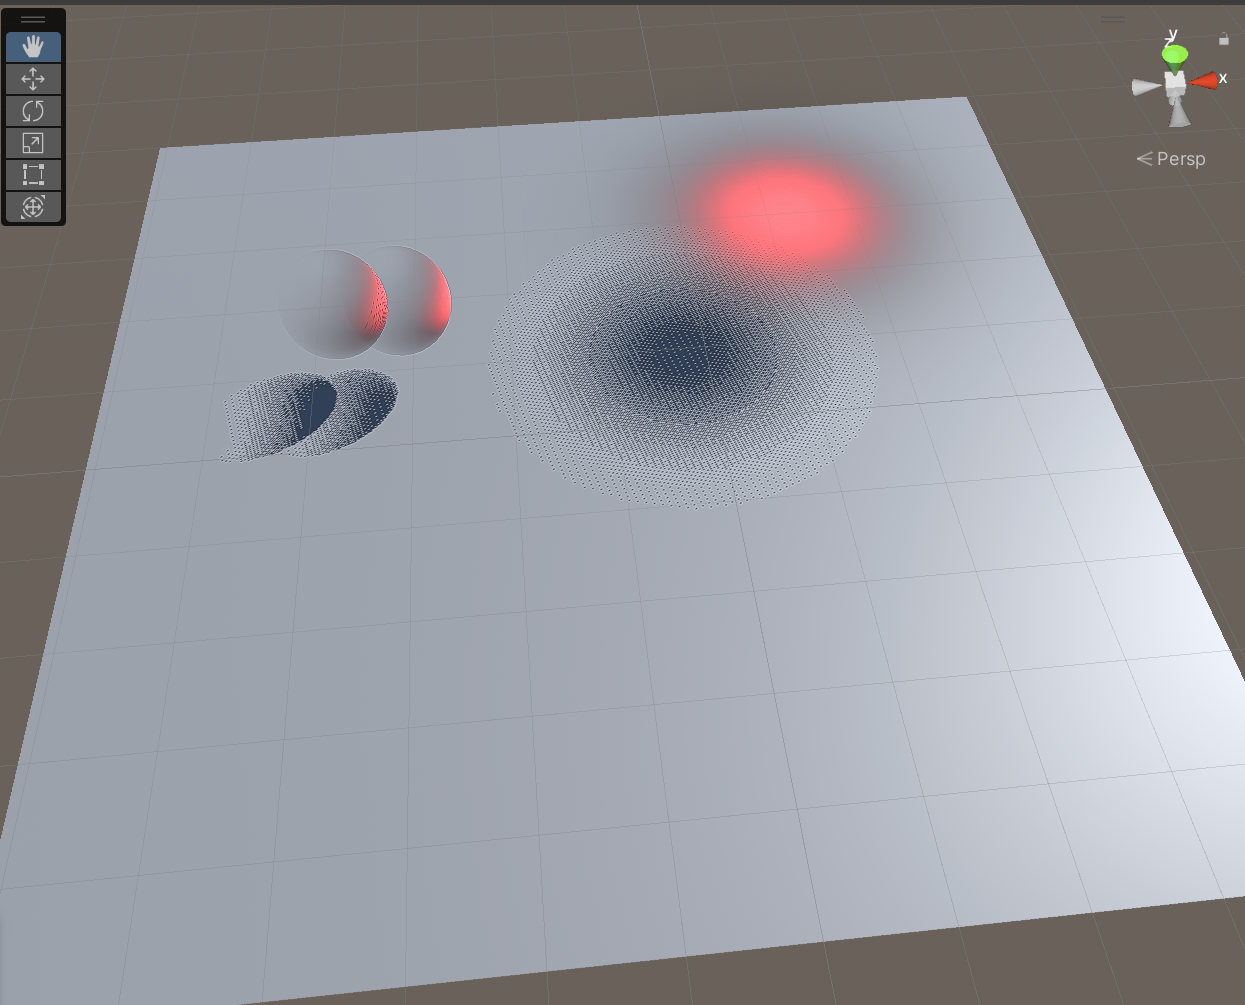
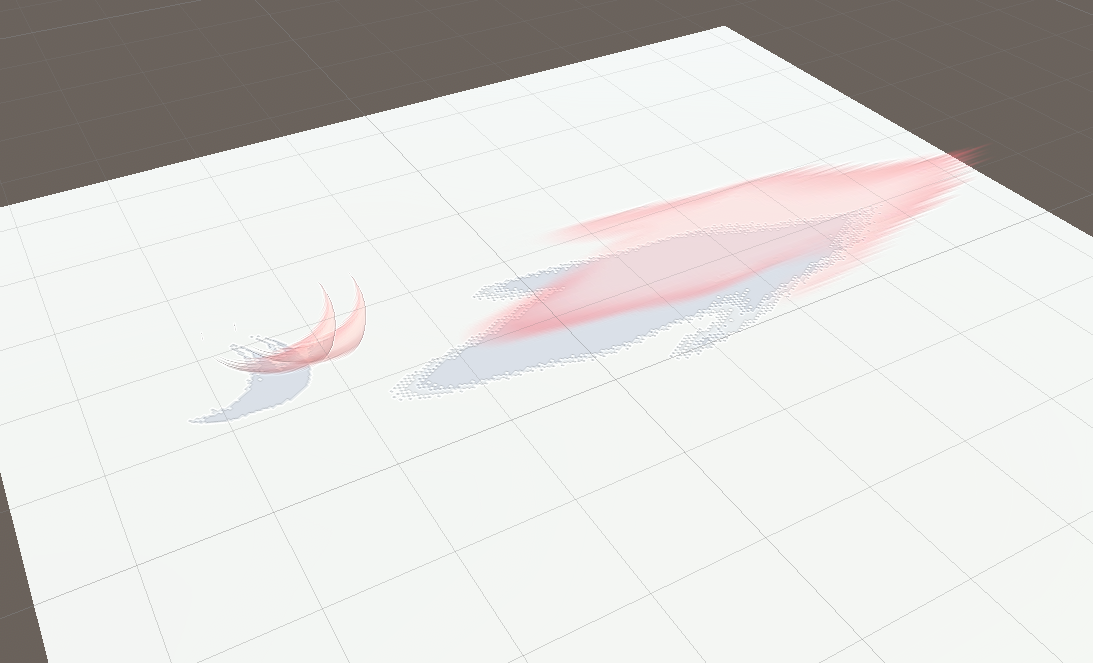
可以看到噪点非常严重,切换到软阴影:
噪点仍然很严重。
改进Dither算法
使用URP提供的硬编码dither矩阵,可以提升性能:
https://docs.unity3d.com/Packages/com.unity.shadergraph@16.0/manual/Dither-Node.html
https://en.wikipedia.org/wiki/Ordered_dithering
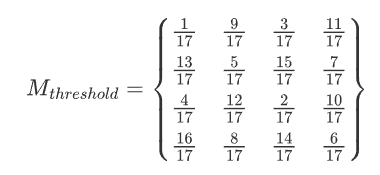
                    float ditherMatrix[16] =
                    {
                        1.0 / 17.0,  9.0 / 17.0,  3.0 / 17.0, 11.0 / 17.0,
			13.0 / 17.0,  5.0 / 17.0, 15.0 / 17.0,  7.0 / 17.0,
			4.0 / 17.0, 12.0 / 17.0,  2.0 / 17.0, 10.0 / 17.0,
			16.0 / 17.0,  8.0 / 17.0, 14.0 / 17.0,  6.0 / 17.0
                    };
                    float2 ScreenUV = GetNormalizedScreenSpaceUV(input.positionCS) * _ScreenParams.xy;
                    uint index = (uint(ScreenUV.x) % 4) * 4 + uint(ScreenUV.y) % 4;
                    clip( BaseAlpha - ditherMatrix[index]);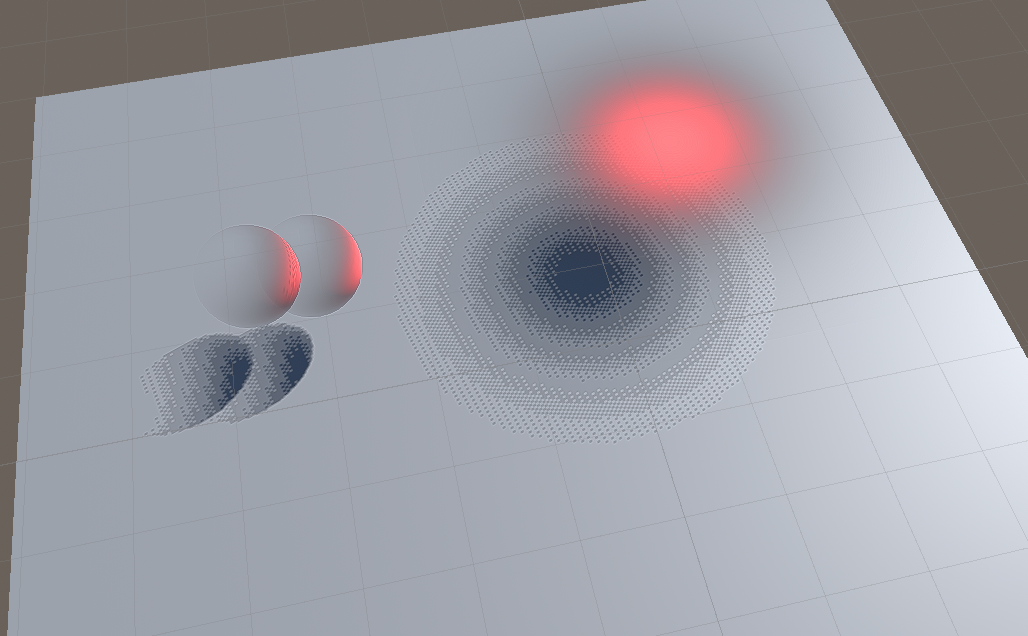
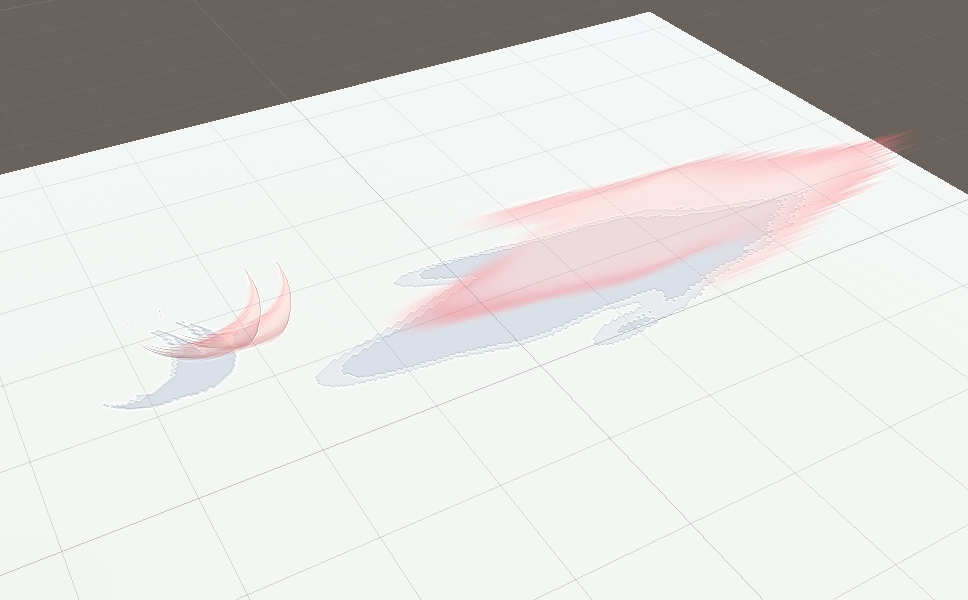
不过,画面上提升并不大,可以看出噪点仍然非常严重。
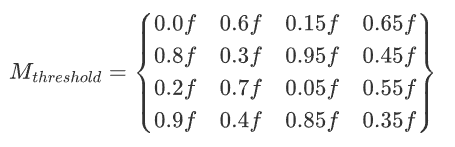
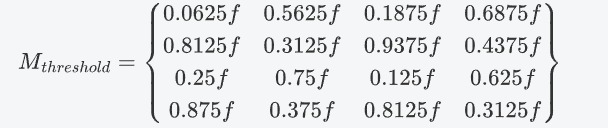
对于硬编码的矩阵,实际上,不同的dither矩阵有不同的dither效果,下列矩阵是由chatgpt生成的,仅作为演示:
比较发散的矩阵(因为有0值,所以dither扩散到了整个区域,仅供演示):
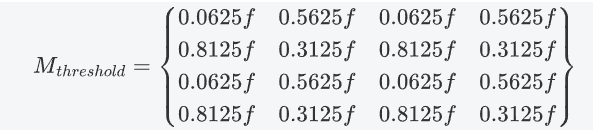
相对收敛的矩阵:
更收敛的矩阵:
dither矩阵:https://github.com/tromero/BayerMatrix
TAA
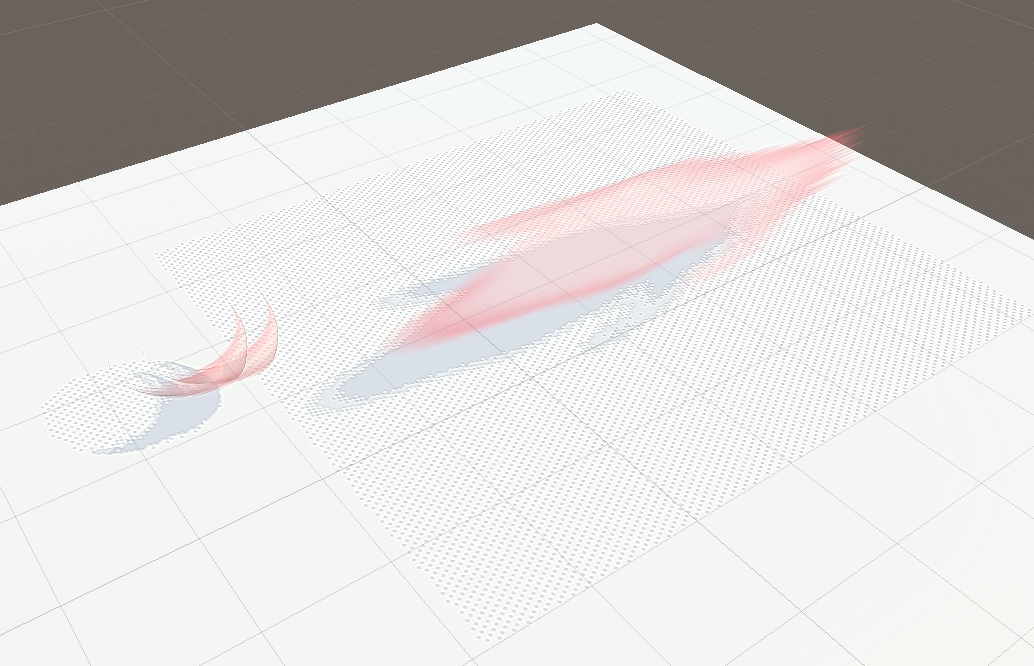
消除噪点的思路有两方面:时间与空间。从时间上,我们可以启用万能的TAA对dither进行改进:
Shader中配合TAA进行Jitter:
                    //TAA_Jitter
                    ScreenUV += _TAA_Jitter * _ScreenParams.xy * 4.0;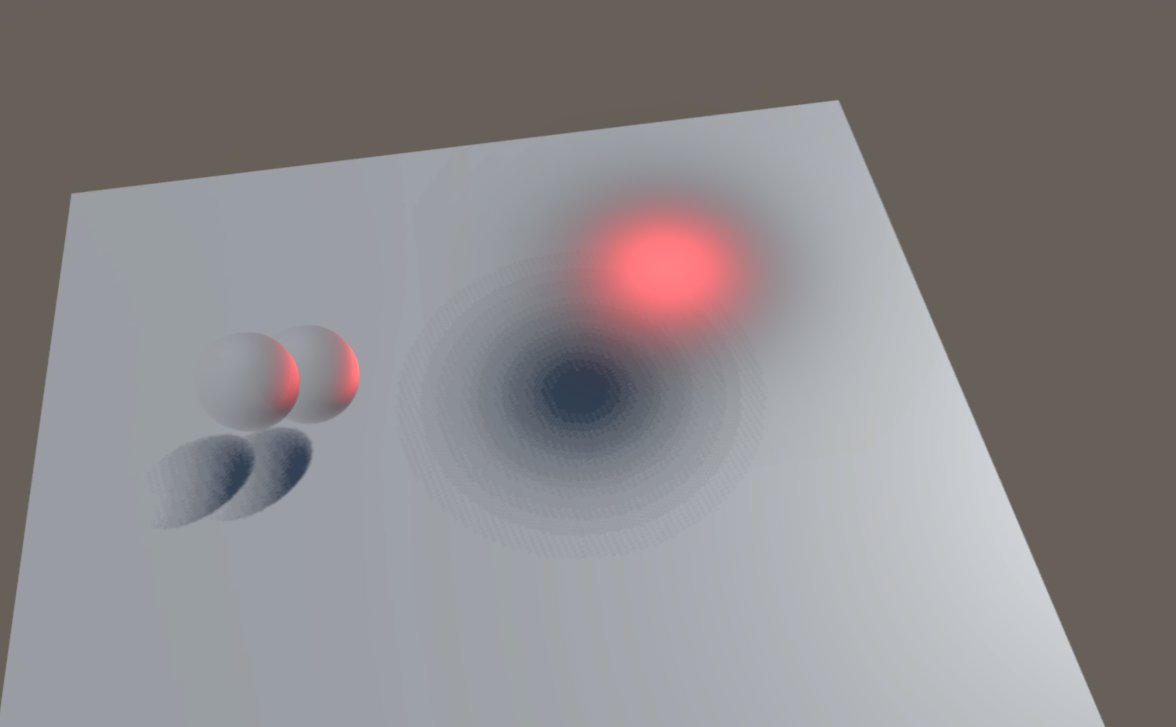
对比上文可以看到画面改进不少。
另外关于后续TAA本身算法的改进,比如MothionVector改进\YCOCG颜色空间等不是本文阐述的重点。
改进URP阴影生成算法
除了时间,我们还可以从空间上的思路改进。
首先阐明一点,从空间上改进阴影,并不是对生成后的ShadowMap做各种处理比如模糊,这种思路是错误的(相关原因详见GAMES202 P3)。而是在生成软阴影时改进,所以只能从URP生成软阴影的算法进行改进。
为了方便对比,我们先关闭TAA:
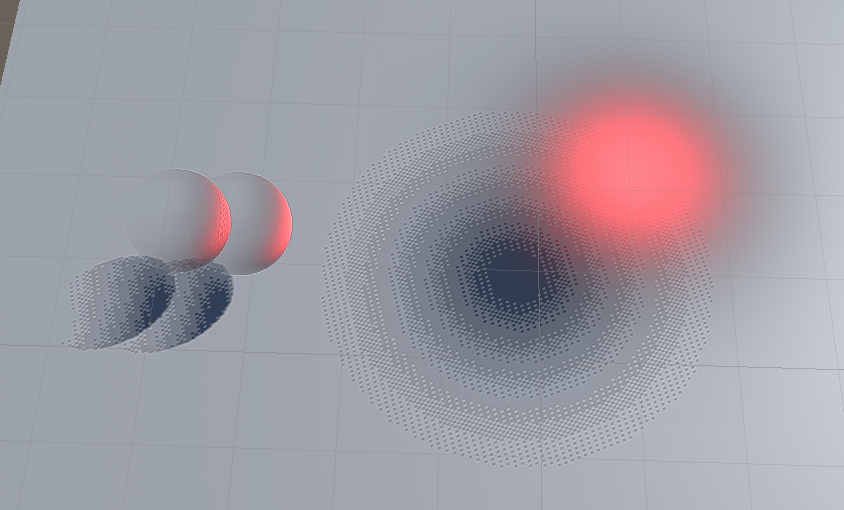
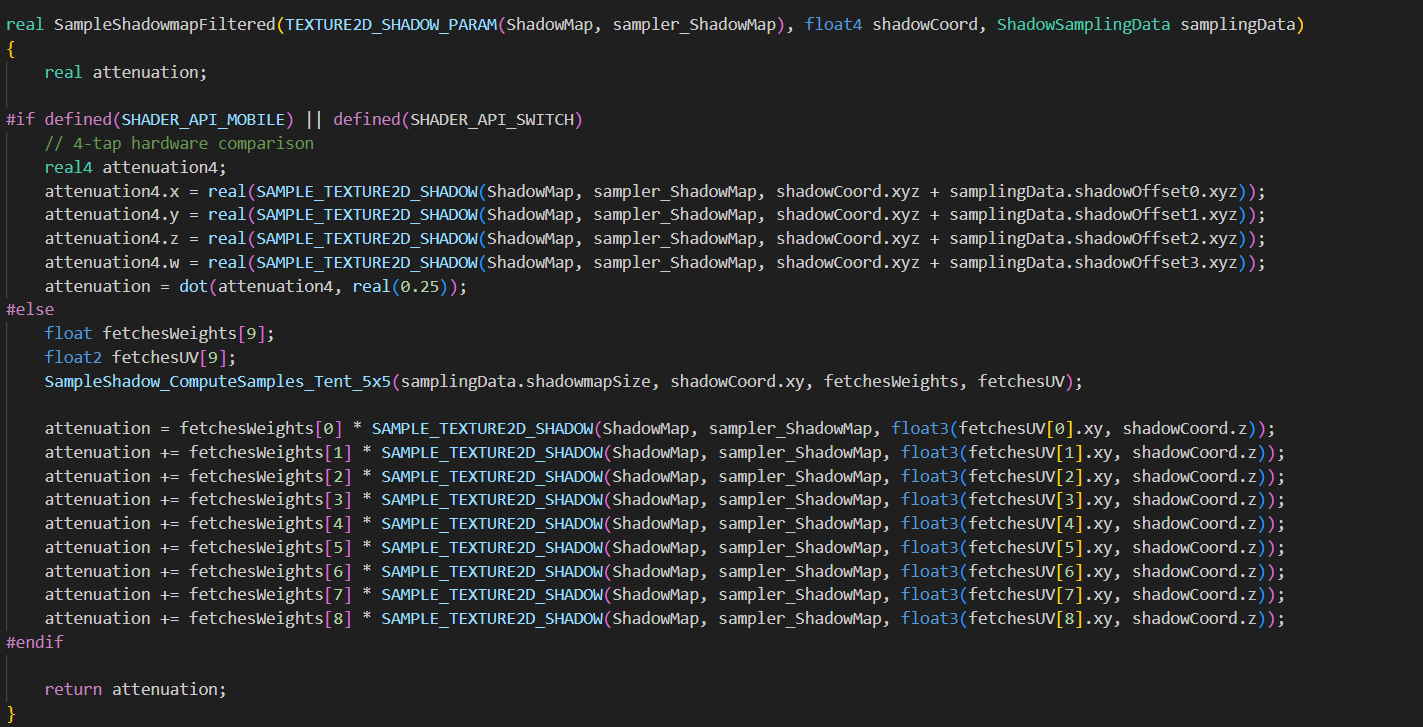
URP12软阴影相关主要在Shadows.hlsl中,可以看见一般情况下采用的是PCF 5X5Tent Filter算法,而默认移动端阴影质量更低,直接采用了4-tap的算法:
可以提高改进PCF质量(Tent Filter算法原理),修改后的效果:
可见即便没有开启TAA,阴影质量也有不小的改善。本文仅抛砖引玉,提供思路,具体如何落地,采用多大的tent filter,可以参照项目的具体需求进行调整,此外还有优化采样器数量等。
综合效果
TAA + PCF 7x7 Tent filter:

总结
Dither无论是用在材质上还是阴影中,本质上都是利用人眼的特性做trick,而且Dither方案对移动物体效果比较差,噪点较多,对于一些近景支持不好。
我们可以从另外一些方案来做半透明物体的软阴影,比如Decal等方式。